Tutorial: Dyeing Self-Striping Yarn
Self-Striping Yarn
You will need:
Some pure wool yarn in a light colour (I am using 2 x 100g of white 4ply bendigo wool)
Food dyes
White vinegar
lots of microwave proof glass dishes
lots of glass dishes for mixing colours
A paintbrush or two
2 chairs
An empty house or a friend who is fibre-mad
Some self-striping yarn you like (optional)
Step 1:
Pull out a section of self-striping yarn til you have the full section you want to repeat (I am using patonyle, so i pulled out one stripe of orange, a pink faux-fair-isle section, a yellow bit and another pink fair isle bit). Tie this section into a loop.
Step 2:
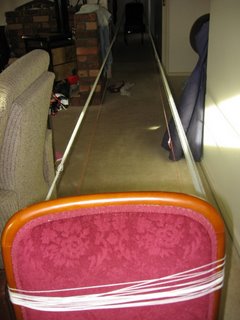
Stretch this loop over the backs of your two chairs (this is where a nice long corridoor helps). This is how long your skein has to be! Now you have to wrap your yarn around these two chairs (if you have one of those thingies that counts your steps you could pretend you are working out as you walk around and around those chairs). if you have a centre-pulling ball this is much easier. You may want to draw your curtains- your neighbours will NOT think this is normal behaviour. Make sure you tie your skein in lots of places -it will be a total bitch if it gets tangled.
 Step 3: Look at your piece of original yarn. tie off the super-skein at the points where you want the stripes to start and end. as long as you give about two metres of yarn per colour you will get stripes so you can get a bit creative. Use a different coloured yarn to tie of for the stripes or you might get confused with the fastening ties.
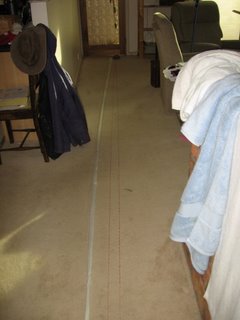
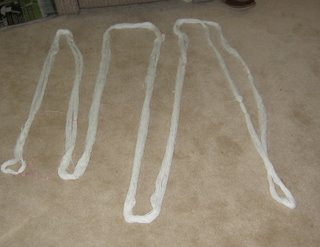 Step 4: Soak your super skein in white vinegar for at least 30 minutes. this is your mordant which sets the dye, so you want it to be really saturated to maintain the colour.
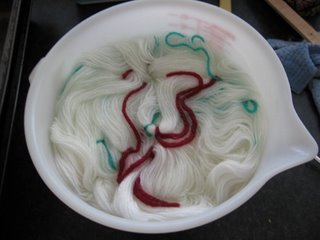 Step 5: Assemble the usual suspects. At this point you can sort out the colours you want and dilute them in water accordingly. dripping a bit on a tissue will give a good indication of the sort of colour you will get.
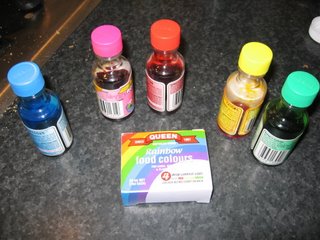
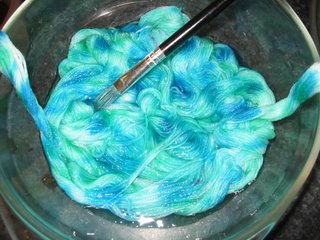
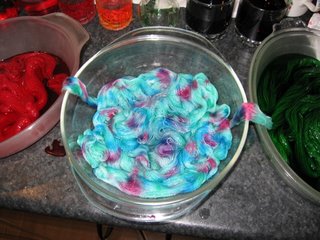
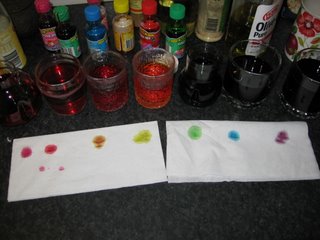 Step 6: Divy out your sections of tied off skein into different glass containers and dye. For the faux-fair-isle bits i've found a wash of a pale colour and then painting spots of darker colours on top. this bit can be as messy as you like.
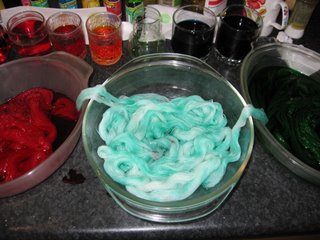
 Step 7: trying to not corrupt the different colour sections, transfer your super-skein into another glass dish.
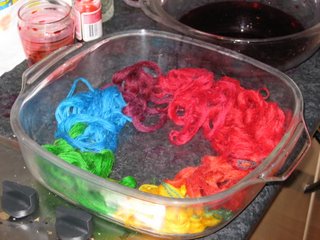 Step 8: Microwave on high for 5 minutes.
 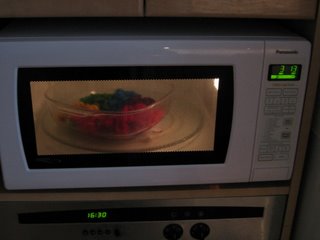 Step 9: cool. (fork is optional if you feel it looks like very bright spaghetti)
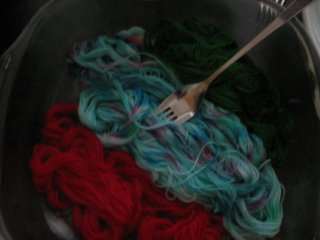 Step 10: Microwave a further 5 minutes. Tip into the sink and rinse in cold water until cool. wring out excess water.
Step 11: dry.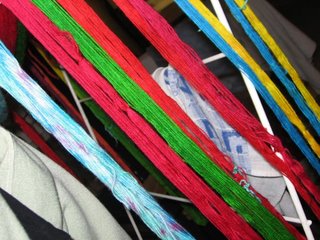 Step 12: sadly you must now spread super-skein across your chairs again to ball up/wind into a manageable skein. if you have a niddy-noddy this may be easier.
The finished product!: 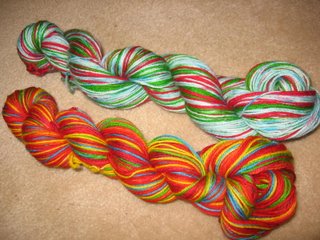
The bottom one is a rainbow ('Lorikeet') and the top is dark pink and green stripes interspersed with a pale aqua faux-fair-isle section ('Peppermint Twist').
NB: WEAR GLOVES!!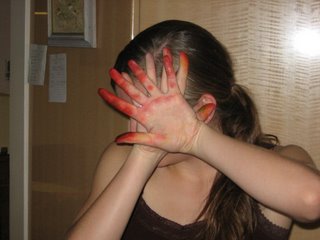
Have fun, knit on
the messy
Ms Spider xo
posted by happyspider @ 8:57 pm
![]()
![]()

16 Comments:
At June 20, 2006 5:13 am, mumblingmonkey said…
You are both a genius and hilarious.
At June 20, 2006 6:56 am, My Five Sons said…
Very good Tute! I have trouble with mine leaching into neibouring parts but having squeezing out most of the offending vinegar I am getting better results!
Thanks for thoughts on my lingering bugs! I think working with smokers may be catching up but as the other gardener is now on Maternity leave I should do better(except for doing the job application for the Maternity part,scream............I can't get started yet!)
At June 21, 2006 5:01 pm, Margie said…
I'm so impressed with your hue saturation. They look brilliant. Maybe I should have another go with my kool aid stuff again after all. Hmmm.
At June 22, 2006 2:14 pm, Bells said…
how clever are you Ms Spider? How freaking clever!!!
At June 23, 2006 9:09 am, Anonymous said…
Well, my kitchen resembled yours last night and it was so much fun! Can't wait for it to dry (damn Canberra winter!) and socks will be on the way!!. Free wool + cheap food dye = great socks!!
At September 04, 2006 5:34 pm, Anonymous said…
I can't tell you how happy I was that someone posted me a link to your tutorial - I've been trying to find out how to do this for ages and photos really help. How important is the microwave? Is it for setting the dye? We live on solar and don't have a microwave so I wondered how crucial this is.
Great colours, love them!
At September 04, 2006 5:42 pm, happyspider said…
I've never done it without a microwave.
HOWEVER! there is a very good tutorial on stovetop dyeing with kool-aid (same chemicals as food colouring dyeing) and you could apply this theory to my system of stripe sectioning. Want more help? beatlewearAThotmailDOTcom
At September 04, 2006 5:43 pm, happyspider said…
and the link for that would be http://neauveau.com/dyeingyarn.html
I'm so sharp it's scary!
At September 06, 2006 8:00 am, Anonymous said…
Thanks for that link happyspider, I'm onto it. Yes, you're very sharp and I appreciate that!
At February 12, 2007 11:19 pm, Anonymous said…
You are fab, trully fab.
At November 12, 2007 8:20 am, Anonymous said…
love love love it ALL. My fave may be the hands. In gratitude, I offer two words: baking soda (sodium bicarbonate).
I discovered this when my pet project depended on preschoolers being able to wash up easily. The theory is that the coloring (and vinegar) is an acid. Baking soda is an antiacid. Make a nice paste with some water, rubba dubba scrubba and VOILA! Back to normal- or as normal as we get....
P.S. This is also great for tomato stains in plastic and coffee stains. Same idea- stain is an acid, bakng soda neutralizes it.
At December 17, 2007 12:58 am, Vicki said…
I just found your tute -- great job! I just have one question -- what does this yarn look like when finally knitted into a project? I'd love to see a photo!
At April 17, 2008 2:31 pm, Anonymous said…
thats heaps for posting this!
haha
i'm a shocker for never wearing gloves!
my hands are always stained right now they are a brown magenta colour
hahaha
i've always wondered how to get the colour skeins like that
thank heaps
kellie
At May 23, 2010 4:11 pm, Zann said…
Hi, hope you are still around and being brilliant, found this searching for dying patonyle, and this technique works and I had everything on hand, proof Aussies rock.
At June 01, 2012 1:42 pm, Anonymous said…
This is gorgeous! i wasnt even looking for it but now i have to try it!!
youre a genious
At June 01, 2012 1:42 pm, Anonymous said…
This is gorgeous! i wasnt even looking for it but now i have to try it!!
youre a genious
Post a Comment
<< Home